
- What is SCIM?
- Architecture Overview
- Implementation Process Overview
- Part 1: Configuring the SCIM Subsystem in ThingWorx
- Part 2: Configuring ThingWorx Platform Settings for Azure AD
- Part 3: Configuring SCIM in Azure AD Portal
- Verifying the Integration
- Monitoring and Maintenance
- Advanced Configuration
- Security Best Practices
- Handling Special Cases
- Disabling User Creation and Modification in ThingWorx SSO Authenticator
- SCIM Subsystem Configuration in ThingWorx
- Common Troubleshooting Issues and Solutions
- Conclusion
- Performance Optimization and Scaling
- Monitoring and Maintenance Best Practices
- Disaster Recovery and Business Continuity
User provisioning and identity management across multiple platforms can be a complex challenge for organizations. This blog post provides a detailed walkthrough for integrating ThingWorx Platform with Azure Active Directory using the System for Cross-domain Identity Management (SCIM) protocol. This setup enables automated user and group provisioning from Azure AD to ThingWorx, streamlining identity management and enhancing security.
What is SCIM?
The System for Cross-domain Identity Management (SCIM) is an open standard designed to simplify user identity management across multiple systems. SCIM enables the automatic provisioning and de-provisioning of user accounts across applications, reducing administrative overhead and security risks.
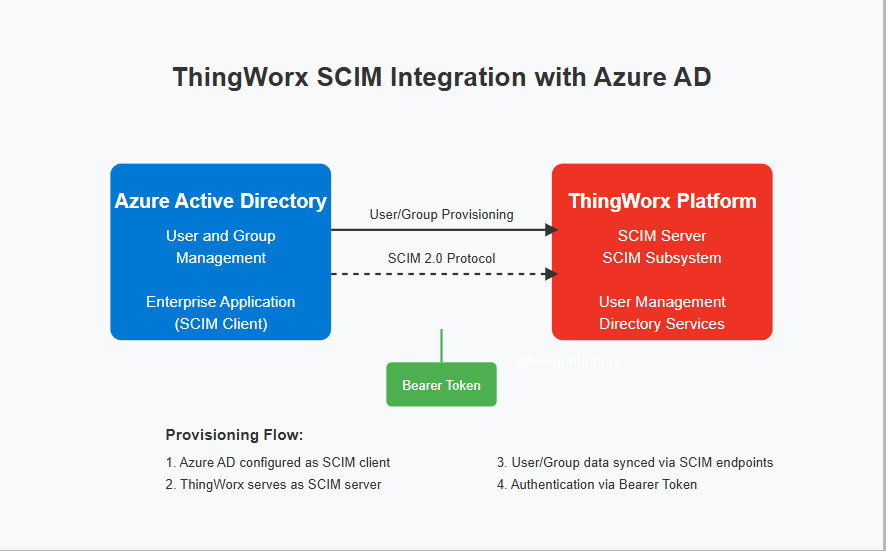
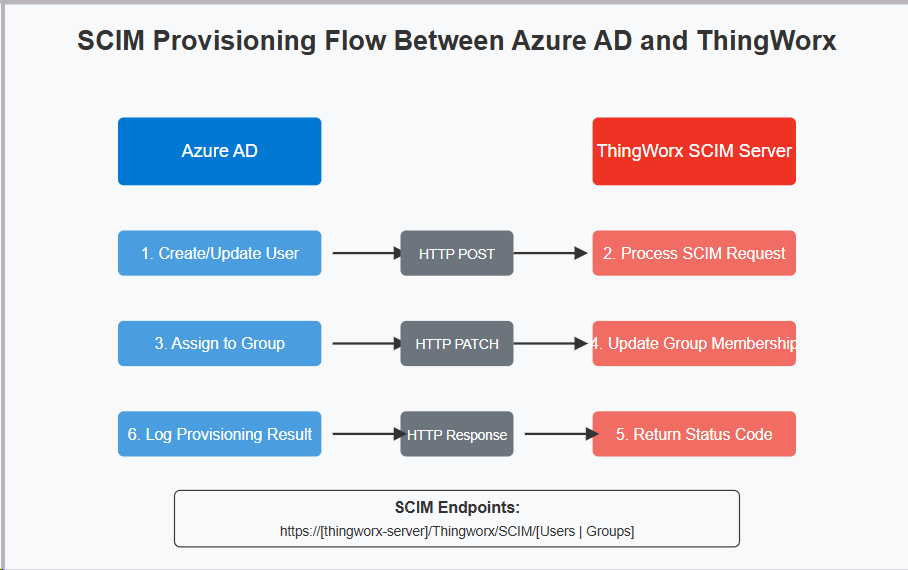
Architecture Overview
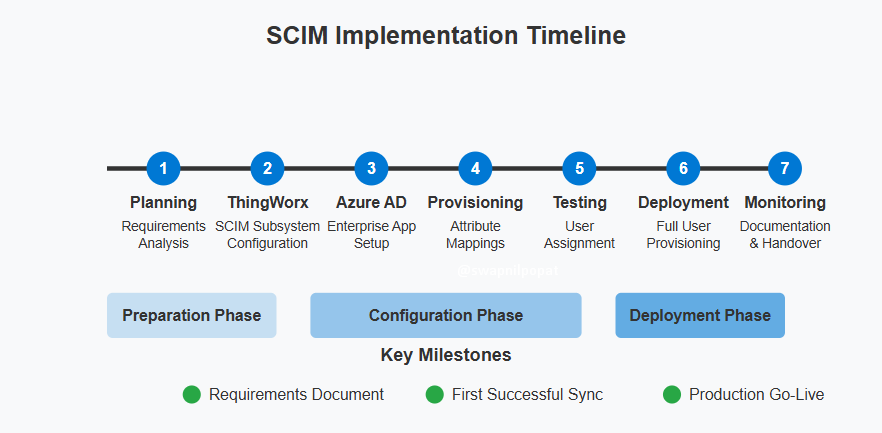
Implementation Process Overview
The integration process consists of three major components:
- Configuring the SCIM subsystem in ThingWorx
- Setting up ThingWorx platform for Azure AD integration
- Configuring Azure AD as a SCIM client
Let’s walk through each of these steps in detail.
Part 1: Configuring the SCIM Subsystem in ThingWorx
ThingWorx’s SCIM subsystem provides the endpoints and processing mechanisms needed to support the SCIM protocol. Here’s how to configure it:
Step 1: Enable the SCIM Subsystem
- Log in to ThingWorx Composer with administrator privileges
- Navigate to the “System” menu
- Select “Subsystems” from the dropdown
- Locate the “SCIMSubsystem” in the list
- If the subsystem is not enabled, click the “Enable” button
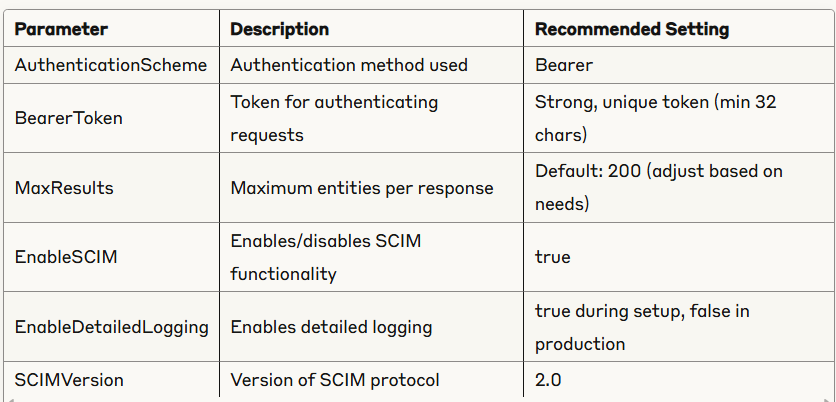
- Configure the following parameters:
- AuthenticationScheme: Set to “Bearer” for Azure AD
- BearerToken: Generate a strong, unique token to authenticate requests from Azure AD
- MaxResults: Set the maximum number of entities to return in a response (default: 200)
- EnableDetailedLogging: Set to “true” for initial setup and troubleshooting
Step 2: Set Up User Creation Security
To ensure that user management is properly handled through SCIM:
- Navigate to “Security” > “Directory Services”
- Select the “SSOAuthenticator” service
- Disable “Allow User Creation” and “Allow User Modification” options
- Click “Save” to apply changes
This configuration ensures that all user management is handled exclusively through the SCIM protocol, preventing inconsistencies between systems.
Part 2: Configuring ThingWorx Platform Settings for Azure AD
Step 1: Create SCIM Bearer Token
- Generate a strong, secure token (minimum 32 characters recommended)
- This token will authenticate Azure AD’s requests to ThingWorx
- Save this token securely as it will be needed in Azure AD configuration
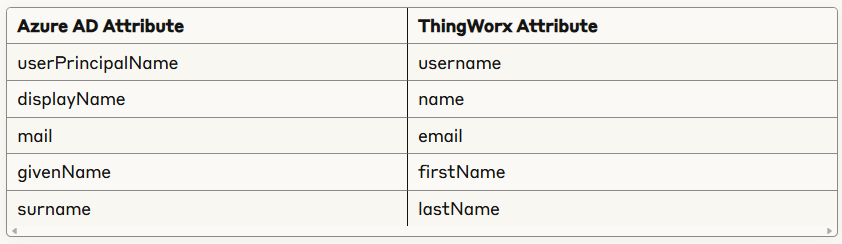
Step 2: Map Azure AD and ThingWorx User Properties
For proper user provisioning, map the user attributes between systems:
Step 3: Understand ThingWorx SCIM Endpoints
The following endpoints will be used in Azure AD configuration:
- Base URL:
https://[your-thingworx-server]/Thingworx/SCIM - Users endpoint:
https://[your-thingworx-server]/Thingworx/SCIM/Users - Groups endpoint:
https://[your-thingworx-server]/Thingworx/SCIM/Groups
Part 3: Configuring SCIM in Azure AD Portal
Step 1: Add Enterprise Application
- Log in to the Azure portal
- Navigate to “Azure Active Directory” > “Enterprise applications”
- Click “New application”
- Select “Create your own application”
- Enter a name (e.g., “ThingWorx Platform”)
- Select “Integrate any other application you don’t find in the gallery (Non-gallery)”
- Click “Create”
Step 2: Configure Provisioning
- In the new enterprise application, navigate to “Provisioning”
- Set “Provisioning Mode” to “Automatic”
- Under “Admin Credentials”, configure:
- Tenant URL: Enter the ThingWorx SCIM base URL (
https://[your-thingworx-server]/Thingworx/SCIM) - Secret Token: Enter the bearer token created in ThingWorx
- Tenant URL: Enter the ThingWorx SCIM base URL (
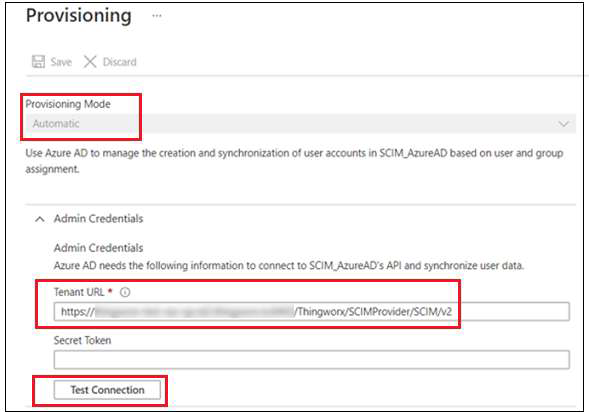
4. Click “Test Connection” to verify connectivity
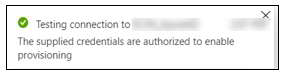
4. Upon successful connection, click “Save”
Step 3: Configure Scope and Mappings
- Under “Settings”, choose what to synchronize:
- Scope: Select “Sync only assigned users and groups” for controlled provisioning
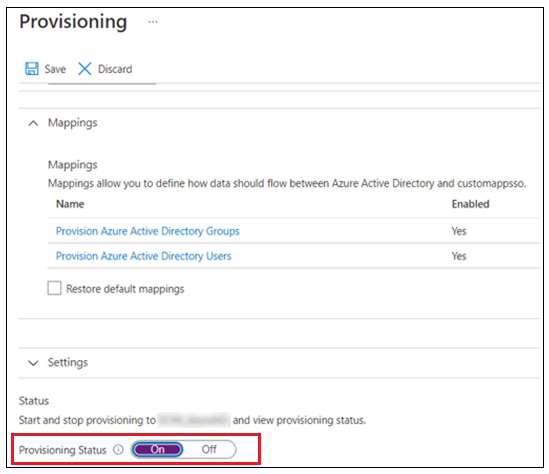
- Configure attribute mappings:
- Navigate to “Mappings” > “Provision Azure Active Directory Users”
- Verify that Azure AD attributes are correctly mapped to ThingWorx attributes
- The default mappings should align with the table provided earlier
- For group provisioning:
- Navigate to “Mappings” > “Provision Azure Active Directory Groups”
- Ensure group attributes are correctly mapped
- Map “displayName” to ThingWorx “displayName”
Step 4: Start Provisioning
- Navigate back to “Provisioning”
- Click “Start provisioning”
- The initial synchronization will begin, which may take several minutes to complete
Verifying the Integration
After configuring both systems, verify that the integration is working correctly:
Step 1: Check Provisioning Logs in Azure AD
- In Azure AD, navigate to the enterprise application
- Select “Provisioning” > “Provisioning logs”
- Review logs for any errors or warnings
Step 2: Verify User Creation in ThingWorx
- Log in to ThingWorx Composer
- Navigate to “Security” > “Users”
- Confirm that Azure AD users have been successfully provisioned
- Check that user attributes are correctly mapped
Step 3: Test Group Synchronization
- Create or modify a group in Azure AD
- Assign users to the group
- Wait for synchronization to complete (typically within 40 minutes)
- Verify that the group appears in ThingWorx and has the correct members
Monitoring and Maintenance
To ensure ongoing success with your SCIM integration:
Regular Monitoring
- Check Azure AD provisioning logs periodically
- Monitor ThingWorx SCIM subsystem logs for errors
- Verify that user and group changes in Azure AD are reflected in ThingWorx
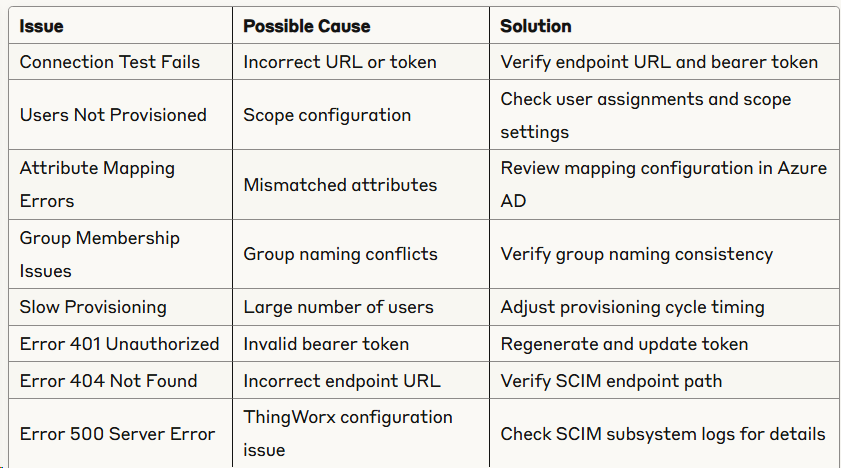
Troubleshooting Common Issues
- Connection Failures: Verify the bearer token and endpoint URLs
- Attribute Mapping Issues: Review attribute mappings in Azure AD
- Missing Users/Groups: Check the provisioning scope and assignment status
- Performance Issues: Consider adjusting the MaxResults parameter in the ThingWorx SCIM subsystem
Advanced Configuration
Customizing User and Group Schema
If your organization requires additional attributes to be synchronized:
- Navigate to the Azure AD enterprise application
- Select “Provisioning” > “Mappings”
- Add custom attributes as needed
- Ensure corresponding properties exist in ThingWorx
Handling Multiple Identity Sources
When ThingWorx connects to multiple identity providers:
- Implement naming conventions to distinguish users from different sources
- Consider using scoping filters in Azure AD to control which users are provisioned
- Regularly audit user accounts to ensure proper synchronization
Security Best Practices
- Rotate Bearer Tokens: Regularly update the bearer token for enhanced security
- Use HTTPS: Ensure all SCIM endpoints use HTTPS for secure communication
- Limit Scope: Only synchronize users and groups that require access to ThingWorx
- Audit Trail: Maintain logs of all provisioning activities for compliance purposes
- Role-Based Access: Assign appropriate roles to provisioned users in ThingWorx
Handling Special Cases
Handling User De-provisioning
When a user is disabled or deleted in Azure AD:
- Azure AD sends a PATCH request to update the user’s status in ThingWorx
- ThingWorx processes this request and disables the user account
- For deletions, Azure AD sends a DELETE request to the user’s SCIM endpoint
- ThingWorx removes or deactivates the user based on your configuration
Group Membership Changes
When group memberships change in Azure AD:
- Azure AD sends a PATCH request to the Groups endpoint
- ThingWorx processes the request and updates group memberships
- Corresponding permissions in ThingWorx are updated accordingly
- Users gain or lose access based on their group memberships
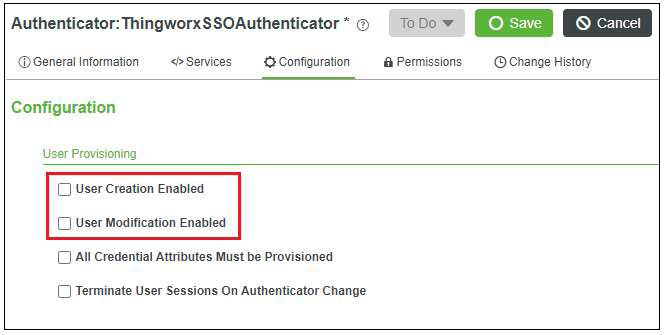
Disabling User Creation and Modification in ThingWorx SSO Authenticator
To ensure centralized management through SCIM, disable direct user creation and modification:
- Log in to ThingWorx Composer as an administrator
- Navigate to “Security” > “Directory Services”
- Select the “SSOAuthenticator” service
- Uncheck the “Allow User Creation” checkbox
- Uncheck the “Allow User Modification” checkbox
- Click “Save” to apply changes
This ensures that all user management occurs through Azure AD, maintaining a single source of truth for identity management.
SCIM Subsystem Configuration in ThingWorx
The SCIM subsystem in ThingWorx provides the server-side implementation of the SCIM protocol. Here’s a detailed look at its configuration parameters:
The subsystem exposes the following SCIM endpoints:
/ServiceProviderConfig: Provides info about SCIM capabilities/Schemas: Defines the schema for user and group entities/ResourceTypes: Defines resource types supported by the server/Users: Endpoint for user management operations/Groups: Endpoint for group management operations
Common Troubleshooting Issues and Solutions
Conclusion
Implementing SCIM-based user provisioning between Azure AD and ThingWorx provides significant benefits:
- Automated User Management: Eliminates manual user creation and updates
- Single Source of Truth: Azure AD serves as the authoritative identity source
- Enhanced Security: Immediate deprovisioning when users leave the organization
- Reduced Administrative Overhead: Streamlined user lifecycle management
- Improved Compliance: Consistent user management process across systems
By following this comprehensive guide, you’ve established an automated, secure, and efficient user provisioning system between Azure AD and ThingWorx. This integration not only streamlines administrative tasks but also enhances security by ensuring that access management remains consistent across your organization.
Performance Optimization and Scaling
To ensure optimal performance as your organization grows:
Initial Synchronization Optimization
- Schedule during off-hours
- Initial sync can be resource-intensive
- Schedule during periods of low system usage
- Monitor server performance during synchronization
- Incremental approach
- Consider synchronizing users in batches
- Start with smaller groups before full deployment
- Validate each batch before proceeding
Ongoing Performance Tuning
- Sync Cycle Frequency
- Default: Every 40 minutes
- Adjust based on your organization’s needs
- Less frequent cycles reduce server load but increase provisioning delay
- Logging Levels
- Use detailed logging during setup and troubleshooting
- Reduce to standard logging for production to minimize impact
- Periodically review logs for unexpected errors
- Resource Allocation
- Monitor CPU and memory usage during sync cycles
- Allocate additional resources if performance issues arise
- Consider database optimization for ThingWorx user entities
Monitoring and Maintenance Best Practices
Regular Health Checks
- Daily Checks
- Review provisioning logs for errors
- Verify recent user provisions completed successfully
- Check ThingWorx SCIM subsystem status
- Weekly Checks
- Full reconciliation between Azure AD and ThingWorx users
- Group membership verification
- Performance metrics review
- Monthly Checks
- Bearer token rotation
- Comprehensive audit of user access
- Review and update documentation as needed
Audit and Compliance
- Provisioning Reports
- Generate provisioning reports from Azure AD
- Document user lifecycle events
- Maintain these reports for compliance requirements
- Access Reviews
- Conduct regular access reviews in Azure AD
- Validate appropriate ThingWorx access
- Document review findings and actions taken
- Security Monitoring
- Monitor for suspicious provisioning activities
- Track failed authentication attempts
- Implement alerts for unexpected changes
Disaster Recovery and Business Continuity
Backup Procedures
- Configuration Backup
- Document all SCIM integration settings
- Export Azure AD enterprise application configuration
- Backup ThingWorx SCIM subsystem settings
- User Data Backup
- Regular backups of ThingWorx user entities
- Document procedures for rebuilding user access
Recovery Procedures
- Token Compromise
- Generate new bearer token in ThingWorx
- Update token in Azure AD provisioning configuration
- Verify connectivity after token change
- Full Resynchronization
- Document procedure for full user resynchronization
- Test recovery process periodically
- Maintain list of key users for priority restoration